Deploying Agents to MLflow
There are a lot of latent challenges around the management of agents for integration into your enteprise application.
In the previous article, we built a ResponsesAgent—a Python-defined agent containing instructions, contextual data access, reasoning logic, and an LLM backend with enough “horsepower” to support generative AI applicaitions. Building an agent is only the first milestone. To make it usable in real applications, the agent must be packaged, registered, versioned, and served through MLflow’s model ecosystem.
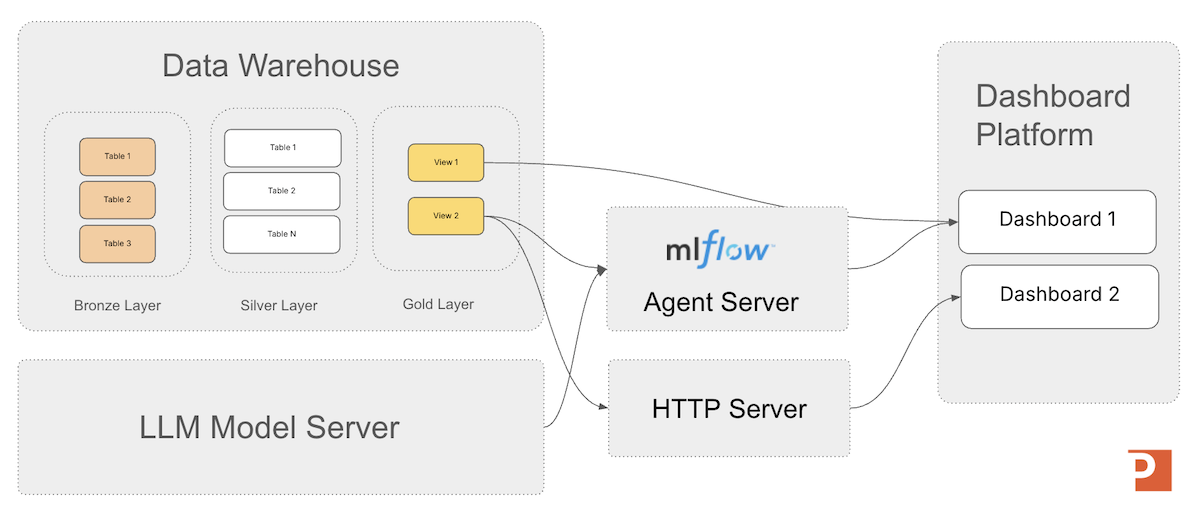
In the first article in our series on MLflow we discussed 3 generalized architecture for building generative AI application. In the image below you can see the decision intelligence architecture that is a great example to keep in mind while we deploy our agent in this article.
This article focuses on the two major steps after authoring an agent:
- Packaging the agent so MLflow can serialize its code, prompts, configuration, and dependencies into a deployable model artifact.
- Registering the agent in the MLflow Model Registry so it can be versioned, promoted, and deployed consistently across environments.
By the end, you will have a ResponsesAgent published in the MLflow Model Registry, served as an HTTP microservice, and verified to be operational.
Packaging the ResponsesAgent
Packaging is the process of turning your agent’s Python implementation into a standardized MLflow model artifact. This artifact is what the model server loads to perform inference, ensuring consistent behavior across environments—local development, Databricks Model Serving, or self-hosted MLflow servers.
Packaging takes your in-code ResponsesAgent definition:
import mlflow
from mlflow.pyfunc import ResponsesAgent

from mlflow.types.responses import (
    ResponsesAgentRequest,
    ResponsesAgentResponse
)

class MyMinimalAgent(ResponsesAgent):

    def load_context(self, context):
        pass

    #def predict(self, model_input):
    def predict(self, request: ResponsesAgentRequest) -> ResponsesAgentResponse:
        return ResponsesAgentResponse(
                    output=[
                        # "id" can be any stable string you choose for this output item
                        self.create_text_output_item(text="hello world", id="msg_1"),
                    ]
                )
…and turns it into a portable, immutable snapshot that contains:
- The agent’s Python code
- Prompt templates and YAML configuration
- Tool definitions
- LLM client dependencies
- The MLmodel metadata file
- Any additional resources (e.g., embeddings, retrieval index pointers)
MLflow bundles these assets so the model server does not need access to your development environment.
What physical assets are produced?
When packaged, the agent becomes a directory inside the MLflow run’s artifact store:
artifacts/
    my_agent/
        MLmodel
        python_env.yaml  (or conda.yaml)
        code/
            my_agent_code.py
            tools/
            prompts/
        artifacts/
            config/
            resource_files/
The MLmodel file describes how the agent should be reconstructed and which Python class implements inference.
The code/ directory contains exactly the agent source code you provided through code_paths=....
Add the Model to the MLflow Tracking Server by Logging the Model
You send the package by logging the model with the call mlflow.pyfunc.log_model(...). Logging is the act of serializing the agent into the MLflow tracking server’s artifact store.
Logging an agent establishes a fixed snapshot of its code and configuration at a specific point in time, enabling consistent evaluation of quality, behavior, and performance as the agent evolves. This snapshot provides a stable reference for experimentation, regression testing, and comparison across iterations of the agent’s design.
Models from Code
Databricks recommends using MLflow's Models from Code capability for this workflow. Under this approach, the agent’s implementation is stored as a Python file, and its execution environment is recorded as a set of required packages. When the agent is deployed, MLflow reconstructs the environment and executes the Python file to load the agent into memory so it can serve inference requests reliably and consistently across deployments.
Models from Code Approach: Packaging via PyFunc
Once you have your ResponsesAgent defined, then you'll need to log it with the tracking server to get started with your deployment as seen in the code below.
    agent = helloworld.MyMinimalAgent()

    with mlflow.start_run():
        logged = mlflow.pyfunc.log_model(
            name="MyMinimalAgent",
            python_model=agent,
        )
        run_id = mlflow.active_run().info.run_id

    print("Model URI:", logged.model_uri)
    print("Run ID: ", run_id)
Note: artifact_path defines the directory inside the MLflow Run’s artifact store where the model will be logged.
When you call mlflow.pyfunc.log_model(), MLflow must place the serialized model (its MLmodel file, code assets, environment spec, and dependencies) somewhere within the run’s artifact hierarchy. The artifact_path value becomes the subdirectory name under that run.
You can also provide a python file that contains a ResponsesAgent subclassed agent definition as well for the python_model.
In that case, inside the python file you'll need to provide a mlflow.models.set_model() call.
The mlflow.models.set_model() API is a fluent interface used with the "Models from Code" feature in MLflow, which programmatically defines an MLflow model within a Python script.
mlflow.models.set_model() is a packaging-time hook used with Models from Code to tell MLflow “this is the actual ResponsesAgent object to package in this file.”
It tells MLflow which Python object in the script is the model to be logged.
Once we have our model URI from MLflow, we want to register the agent in the MLFlow Model Registry to manage its lifecycle.
What Does mlflow.start_run() Do?
What does mlflow.start_run() do in MLflow 3.6?
mlflow.start_run() creates (or resumes) a run context—a structured container where MLflow logs everything associated with an execution, such as:
- Parameters
- Metrics
- Artifacts (files, code, prompt assets, knowledge bases, etc.)
- Logged models and agents
- Run metadata (timestamps, status, user, environment, etc.)
It’s like pressing the “Record” button: everything you log inside this context is versioned and attached to that run.
A run is the atomic tracked execution in MLflow—it represents a single attempt to create or update a model or agent. But its purpose differs slightly depending on the asset type.
A run represents a training lifecycle event, such as:
- Training a regression model
- Fine-tuning a neural network
- Running feature experiments
It captures the full lineage of the model including inputs, outputs, and lifecycle. So if you retrain tomorrow you get a new run.
A run represents the packaging and publishing event: defining agent behavior (system prompt, tools, routing logic), bundling assets (text files, embeddings, yaml configs), and versioning the code and prompt instructions.
Agents aren’t trained—they’re versioned and governed like other MLflow models. A ResponsesAgent run is basically: “I am capturing how this agent works at this moment in time and what it depends on.”
Registering the Agent with the MLflow Model Registry
Once packaged, the agent must be registered in the Model Registry. This is where lifecycle operations occur—versioning, promotion, rollback, and auditability.
If you logged the agent with registered_model_name=..., MLflow automatically created a model version. If not, you can manually register:
registered_model_name = "MyMinimalAgent_Registered"
registered_model_stage = "candidate"

mv = mlflow.register_model(register_full_model_uri, registered_model_name)
This creates Version 1 of the model.
Just to be clear in how the lifecycle works and how its different from the packaging phase above, I want again state:
-
mlflow.models.set_model()is a packaging-time hook used with Models from Code to tell MLflow “this is the actual ResponsesAgent object to package in this file.” -
mlflow.register_model()is a lifecycle/registry API used after logging to create a named, versioned entry for that agent in the Model Registry (Unity Catalog or workspace).
They solve completely different problems in the deployment pipeline.
Managing the Agent Lifecycle
As you refine the agent—improved prompts, updated tools, different reasoning logic—new versions are created. The code listing below shows how to programmatically get the latest version number of your model.
client = MlflowClient()
client.get_model_version_by_alias(
    name="MyMinimalAgent_Registered",
    alias="candidate"
)
Once you are satisfied with the performance of your agent, you can promote it to a staging or production status in the model registry, as shown in the python code listing below.
  client = MlflowClient()
client.set_registered_model_alias(
    name="MyMinimalAgent_Registered",
    alias="prod",
    version="7"
)
Additionally the URI format to load a ResponseAgent registered agent is shown in the example below.
registered_model_name = "MyMinimalAgent_Registered"
registered_model_stage = "prod"
load_full_model_uri = "models:/" + registered_model_name + "@" + registered_model_stage
model = mlflow.pyfunc.load_model(load_full_model_uri)
Aliases Replace Stages in MLflow 3.x
Stages are being removed and how aliases replace them in MLflow 3.x.
Why?
Model stages encoded a global, mutually exclusive lifecycle state that proved too rigid for modern CI/CD, multi-environment deployments, and parallel serving patterns. Model aliases replace stages with explicit, versioned routing pointers that enable safe promotion, instant rollback, and concurrent deployments without ambiguity.
Downstream consuming applications can then not worry about model versions and just focus on working with the aliased staging or production (or whichever alias system you designate) model provided.
A best practice is that applications should reference the alias, not a specific version number:
models:/retail.ai.logistics_agent@Production
This allows version 3 → version 4 promotion without breaking downstream systems.
Confirm the model is operational
You can load and test the deployed agent locally:
registered_model_name = "MyMinimalAgent_Registered"
registered_model_stage = "prod"
load_full_model_uri = "models:/" + registered_model_name + "@" + registered_model_stage
model = mlflow.pyfunc.load_model(load_full_model_uri)

result = model.predict({
    "input": [
        {"role": "user", "content": "Why is OTIF down this week?"}
    ]
})

print(result)
Or test the HTTP-serving endpoint --- start by taking the registered model alias and starting a dedicated model server:
mlflow models serve \
  --model-uri models:/MyMinimalAgent_Registered_2@prod \
  --host 0.0.0.0 \
  --port 5000 \
  --no-conda
Once the server is running, the REST inference endpoint is:
POST http://localhost:5000/invocations
This endpoint is always /invocations for the MLflow model server.
Once we have our model server running we can test it with a python program such as:
import requests

payload = {
    "input": [
        {"role": "user", "content": "Why is OTIF down this week?"}
    ]
}

response = requests.post(
    "http://localhost:5001/invocations",
    json=payload
)

print("Testing hello world registered mlflow ResonsesAgent:")
print(response.json())
Your response should look similar to:
python test_hello_world_model_server.py
Testing hello world registered mlflow ResonsesAgent:
{'object': 'response', 'output': [{'type': 'message', 'id': 'msg_1', 'content': [{'text': 'hello world', 'type': 'output_text'}], 'role': 'assistant'}]}
Agent Accelerator
For the Databricks Platform
A 4-week engagement that delivers a custom Decision Intelligence agent on Databricks—grounded in a clear decision owner, explicit business rules, and governed Unity Catalog data models—then deployed to a Databricks Agent Endpoint for testing and production rollout.
Learn MoreSummary
Packaging and registering a ResponsesAgent transforms it from a Python class into a versioned, deployable intelligence service. Once the agent is logged and registered:
- The model registry tracks every change
- The serving system loads a stable artifact
- Each prediction call is repeatable and observable
- Multiple agent versions can be promoted without code changes
With our agent now fully deployed, the next article will focus on integrating the agent into applications—including web dashboards, workflow automation, RPA extensions, BI tools, and microservices. You will see how a deployed MLflow agent becomes a knowledge-work accelerant embedded directly inside operational software.
Next in Series
Integrating Applications with Deployed MLflow Agent Endpoints
MLflow ResponsesAgents enable organizations to embed production-grade, automated reasoning directly into applications, workflows, and decision systems—moving generative AI beyond chat interfaces and into scalable, governed operational intelligence.
Read next article in series